Torch Tagger
Create
GUI
Navigate to Models -> Torch Tagger and click on the CREATE button on top-left. Choose the name for your Torch Tagger (Description). Select indices and fields on which the tagger will be trained. The selected fields should contain textual data. When query is specified, only documents matching to the query are used for training. If you leave Query empty, it will take all documents from the selected indices. If you have any searches defined in your project, they will appear in a dropdown menu if you click on the field Query - you can use existing searches as queries.
Model architecture - an algorithm to use for training the tagger.
Embedding - word embeddings which are used to convert input text to a machine readable format. If not selected, embedding will be trained on the run.
Fact name - name of the fact that the model will learn to predict.
Minimum sample size - minimum number of samples per fact value that the model needs in order to learn to predict that value. If there are less samples with that fact value in the data than the model will just ignore that value during training and will later never predict that value.
Maximum sample size - maximum number of samples per fact value that the model will use to learn to predict that value. If there are more samples with that fact value in the data than the model will just pick n first.
Number of epochs - number of times the entire training dataset will be passed throught the model.
API
Endpoint: /projects/{project_pk}/torchtaggers/
Example:
curl -X POST "http://localhost:8000/api/v1/projects/11/torchtaggers/" \
-H "accept: application/json" \
-H "Content-Type: application/json" \
-H "Authorization: Token 8229898dccf960714a9fa22662b214005aa2b049" \
-d '{
        "description": "My Torch Tagger",
        "fields": ["comment_content_clean.text"],
        "model_architecture": "TextRNN",
        "embedding": 2,
        "num_epochs": 5,
        "fact_name": "TEEMA",
        "indices": [{"name": "texta_test_index"}]
    }'
View
GUI
Navigate to Models -> Torch Tagger. Existing torch taggers are showed in the view (see Fig. 126).

Fig. 126 Torch tagger view
API
Endpoint: /projects/{project_pk}/torchtaggers/
Example:
curl -X GET "http://localhost:8000/api/v1/projects/11/torchtaggers/" \
-H "Authorization: Token 8229898dccf960714a9fa22662b214005aa2b049"
Detailed view
GUI
Navigate to Models -> Torch Tagger. Click on the torch tagger you would like to see in detail (see Fig. 127).
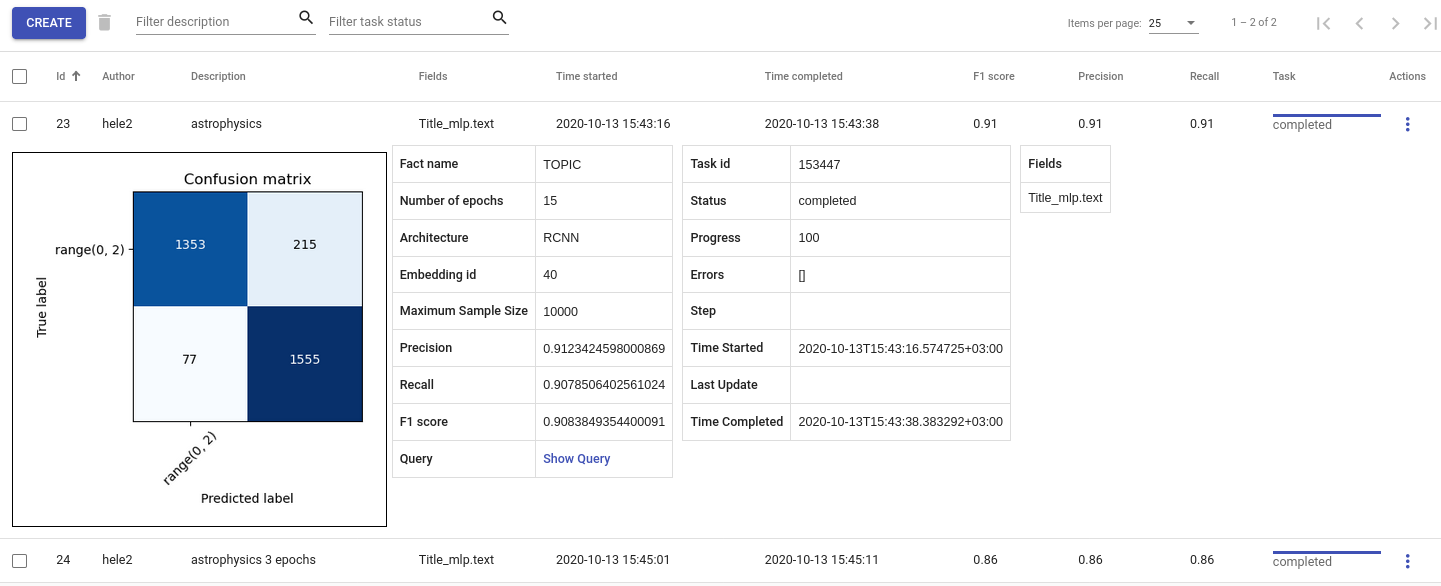
Fig. 127 Torch tagger details
API
Endpoint: /projects/{project_pk}/torchtaggers/{id}
Example:
curl -X GET "http://localhost:8000/api/v1/projects/11/torchtaggers/23/" \
-H "Authorization: Token 8229898dccf960714a9fa22662b214005aa2b049"
Delete
GUI
Navigate to Models -> Torch Tagger. Select model which you would like to delete and click on the trash bin icon next to Create.
API
Endpoint: /projects/{project_pk}/torchtaggers/{id}
Example:
curl -X DELETE "http://localhost:8000/api/v1/projects/11/torchtaggers/23/" \
-H "Authorization: Token 8229898dccf960714a9fa22662b214005aa2b049"
Tag text
GUI
Navigate to Models -> Torch Tagger, click on the three dots under Actions column and choose Tag Text (Fig. 129). Insert text that you want to tag. Check Lemmatize if the text should be lemmatized first. If the tagger is trained on lemmatized data then then the input should also be lemmatized and vice versa. Finally click Post. You should see predicted label (Fig. 128).
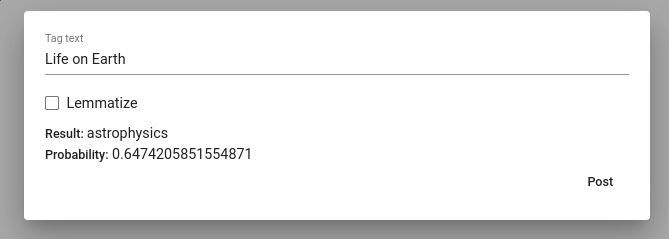
Fig. 128 Torch tagger prediction
API
Endpoint: /projects/{project_pk}/torchtaggers/{id}/tag_text/
Example:
curl -X POST "http://localhost:8000/api/v1/projects/11/torchtaggers/23/tag_text/" \
-H "accept: application/json" \
-H "Content-Type: application/json" \
-H "Authorization: Token 8229898dccf960714a9fa22662b214005aa2b049" \
-d '{
        "text": "Life on Earth",
        "lemmatize": false
    }'
Response:
{
    "result": "astrophysics",
    "probability": 0.6474205851554871
}
Change name of a tagger
GUI
Navigate to Models -> Torch Tagger, click on the three dots under Actions column and choose Edit (Fig. 129).
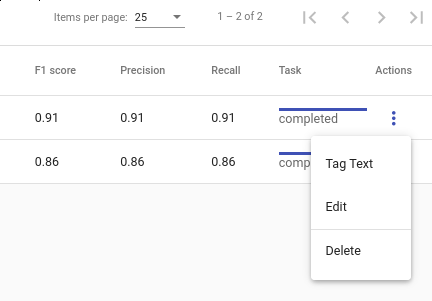
Fig. 129 Tag text with Torch Tagger
API
Endpoint: /projects/{project_pk}/torchtaggers/{id}/
curl -X PATCH "http://localhost:8000/api/v1/projects/11/torchtaggers/23/" \
-H "Authorization: Token 8229898dccf960714a9fa22662b214005aa2b049" \
-H "Content-Type: application/json" \
-d '{"description": "astrophysics yo"}'